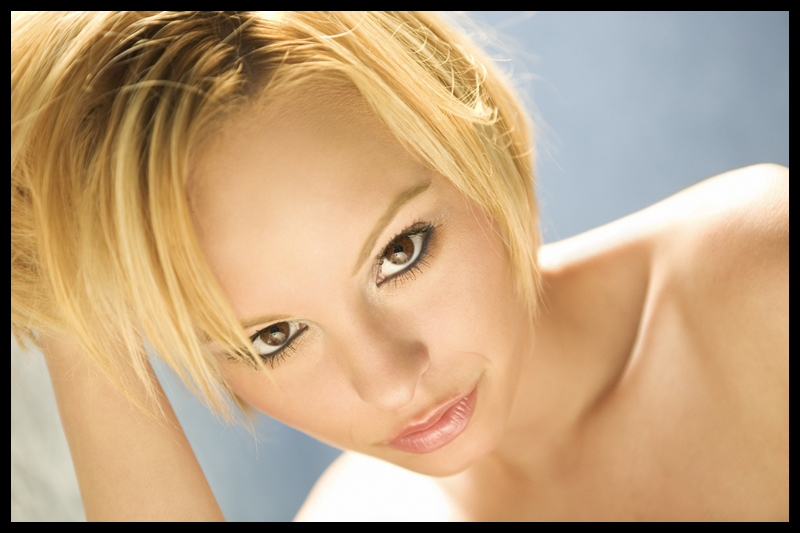
Trataré de explicar como se pueden lograr retratos femeninos impactantes utilizando el filtro Paso Alto y una Capa de Ajuste de Curvas de PhotoShop.
Para ilustrar esta técnica emplearemos la fotografía titulada Aliona 1 de la norteamericana Jane de Just Plain Sexy.
- Duplicar imagen (Ctrol+J)
- Dar el nombre Ajuste piel
- Desenfocar/Desenfoque Gaussiano.
- Radio 9
- Filtros/Otros/Paso Alto. Aplicamos el mismo Radio que en el paso anterior.
- Radio 9
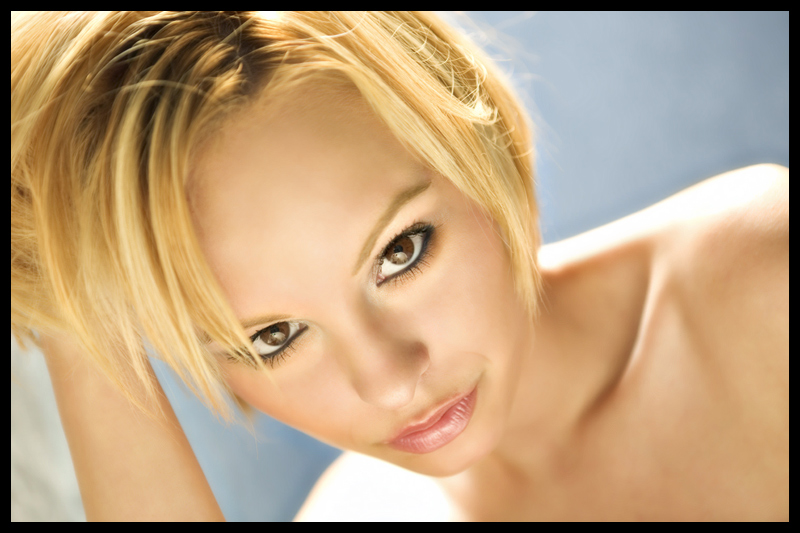
- Ajustar el Modo Fusión de la capa Ajuste piel a Luz Lineal.
- Ajustar la Opacidad de la capa Ajuste piel al 75%.
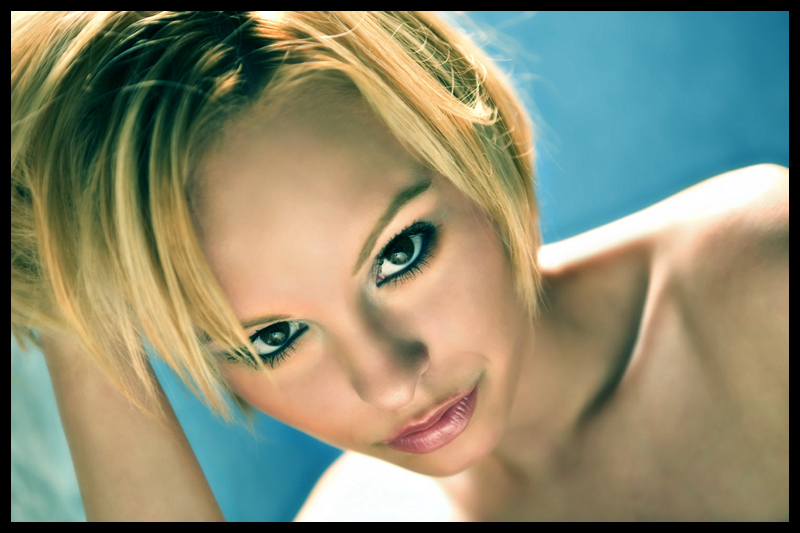
- Proporcionaremos un tono bronceado creando una nueva capa de ajuste. Capa/Nueva capa de ajuste/Curvas. Ajustes:
- Rojo: 161-61
- Verde: 85-53
- Azul: 188-173
Espero que os resulte interesante.
To illustrate this technique we will use the photograph titled Aliona 1 by North American Jane from Just Plain Sexy.
1. Duplicate the image (Ctrl+J)
2. Name it Skin adjustment.
3. Blur/Gaussian Blur (Radius 9)
4. Filters/Others/High Pass. Use the same radius as in the previous step (Radius 9)
5. Adjust the Fusion Mode of the Skin adjustment layer to Linear light.
6. Adjust the Opacity of the Skin adjustment layer to 75%.
7. Apply a tan tone by creating a new adjustment layer.
Layer/New adjustment layer/Curves. Settings:
Red 161-61
Green 85-53
Blue 188-173
I hope this has proven interesting for you.
Muyyy buenooo gracias!
no queda nada mal la transformación
un saludo
gracias por la ayuda, a mi el photoshop me tiene mal, mi chica lo maneja bien, de hecho es una herramienta muy úitl en su trabajos, creo que esto le va a interesar.
el resultado veo que es muy bueno…
saludos te dejo mi voto de hoy!
Es interesante y útil conocer esta técnica pero en mi caso particular prefiero la naturalidad de la primera toma. Saludos
Llevaba mucho tiempo buscando este truco. Lo he visto muchas veces en las fotografías de moda y belleza. Muchas gracias por compartir este retoque.
Gracias por compartir este retoque con todos los que paseamos por estos lares. Gracias por tu generosidad
La verdad es que me parece muy útil ésto. Yo también lo llevo viendo por muchos sitios y no sabía bien cómo se hacía. Sigo sin manejarme demasiado bien con el gran monstruo.
Un saludo. 🙂
Muy buen Tip para los usuarios de photoshop… 🙂
oye me gusta mucho amigo juan, cambia radicalmente la foto, lo pondre en practica a ver que tal… saludos!!!
Dile a Sandra Fradera que no supe verla y que hoy soñé con ella y que sonreía… mucho y abría sus brazos feliz 🙂
Dile que el día que hice el audio tenía la regla y que quería hacertelo pero no era el momento… que debía esperarme … que es cojonuda 🙂
un beso
Me ha parecido muy muy interesante como darle un tono bronceado con los niveles por canales. Gracias señores!
Muchas gracias Juan por compartir tu experiencia con nosotros!!
Excelente tuto, lo voy a probar un beso
Buen día J.Garcia. El tutorial que queria encontrar, antes, yo aplicaba un desenfoque gausssiano y luego añadia algo de ruido. Pero a ver como me va con ésta tecnica. Ojala vengan más como este. Un abrazo, saludos.
Creo que acabo de empezar a adorar ahora mismo este blog… porque me das consejos de photoshop! una materia que a mi siempre se me resiste! Así que tienes mi voto de hoy
Un saludo!
El filtro y la tecnica seguro son utiles, pero el resultado final no me gusta.
La chica queda con el pelo verde y parece tener una enfermedad de piel.
Continuo com mi tecnica de desfoque, realce y cambio de curvas, que no cambia tanto la folta pero me satisface los resultados.
Exemplo
Muy bien explicado. Yo le habría dado subexposición al hombro derecho que, para mi gusto brilla demasiado.
Gracias!
A mí el B/N de laboratorio ya se me iba dando bien,
pero desde que abandoné la ampliadora… Todo me resulta un poco triste.
Tienes un blog requeteinteresante y requeteinformativo.
Me alegro de haberte encontrado.
Un saludo.
Vaya… cuantos te encontramos …
Yo venía a hablarte de retoques… de lo muy buenas que me han parecido … ¿ves? y se me ha olvidado…
Cuanta alegría se derrocha en tus espacios… cuánta será auténtica, cuánta no… cuánto todo, estoy triste hoy.
Sigue siendo un placer pasarse por aqui. Y aprender. Me lo apunto.
Saludos desde el agua.
hola, me podeis explicar que significa en ajuste de curvas Rojo: 161-61 ?? gracias
Alfonso, en quesabesde tienes un artículo sobre el Ajuste de curvas por canales.
Muchas gracias por registrar vuestros comentarios.
Muy interesante 🙂
Cambia un monton la imagen, queda, diferente.
Gracias.
Hola, no sé si es que yo soy demasiado torpe o es que todo el mundo ha dejado un comentario antes de probar el retoque.
Yo he seguido paso por paso las indicaciones y el resultado final dista muchísimo del mostrado aquí arriba. La imagen queda morada chirriante y apenas pueden distinguirse las formas. Nada que ver con el tono profundo azul tan interesante que se muestra en este tutorial. Creo que el error está en los valores del verde y el azul. 85-53 no puede ser en la vida. Tb he probado invirtiendo los valores de entrada-salida, pero el resultado es aún más aberrante. Me gustariá que repasaras este tutorial pues es un efecto muy interesante. Gracias
Dango, los valores aplicados durante el ajuste de curvas son orientativos y dependen de la imagen que estés retocando.
Muchas gracias a todos por vuestros comentarios.
ME AHORRO LOS ELOGIOS Y AGRADECIMIENTOS………. TE SOBRAN.
YBIEN MERECIDOS. GRACIAS POR ESTE PUNTO DE REUNION PARA COMPARTIR.
POCAS PAGINAS COMO LA TUYA.
ABUSANDO DE TUS CONOCIMIENTOS, COMO SE LOGRA ESE EFECTO COBRIZO,METALICO, BRONCEADO SOBRE LA PIEL, QUE MUCHAS MODELOS TIENEN EN REVISTA DE MODAS O PUBLICIDAD.
TE AGRADEZCO TU ATENCION A TODOS NOSOTROS. SALUDOS DESDE MEXICO.